DotNet&Coverlet统计单元测试覆盖率
前言
代码覆盖率是衡量代码质量的一个指标。较高的代码覆盖率能够显著提升开发者对代码的信心。从逻辑层面来看,代码经过的测试越详尽、越全面,其存在漏洞的概率也就越低。毕竟,在软件开发的实际过程中,要实现一个完全没有任何漏洞的项目,这几乎是一个难以企及的乌托邦式理想。
Coverlet
在日常开发中,像 Visual Studio、Rider 这类常用的集成开发环境(IDE),能够直接查看代码覆盖率。然而,若要将覆盖率管控纳入自动化的质量管控流程,例如 Github Actions、Azure Devops、Github CI 以及 Sonarqube 等系统时,就需要额外开展一些工作。在这种情况下,开源项目 Coverlet(https://github.com/coverlet-coverage/coverlet) 能够发挥重要作用,帮助我们实现这一目标 。
相关包
因执行工具的不同,使用不同的包。
coverlet.collector:VSTest 引擎集成
coverlet.msbuild:MSBuild 任务集成
coverlet.console:作为 .NET 全局工具(支持独立集成测试)
从coverlet源码中也可看出,coverlet.collector/coverlet.msbuild/coverlet.console都是依赖coverlet.core,前三者之间则没有依赖关系。
更换默认包
默认场景下,xUnit测试项目自带的包为coverlet.collector
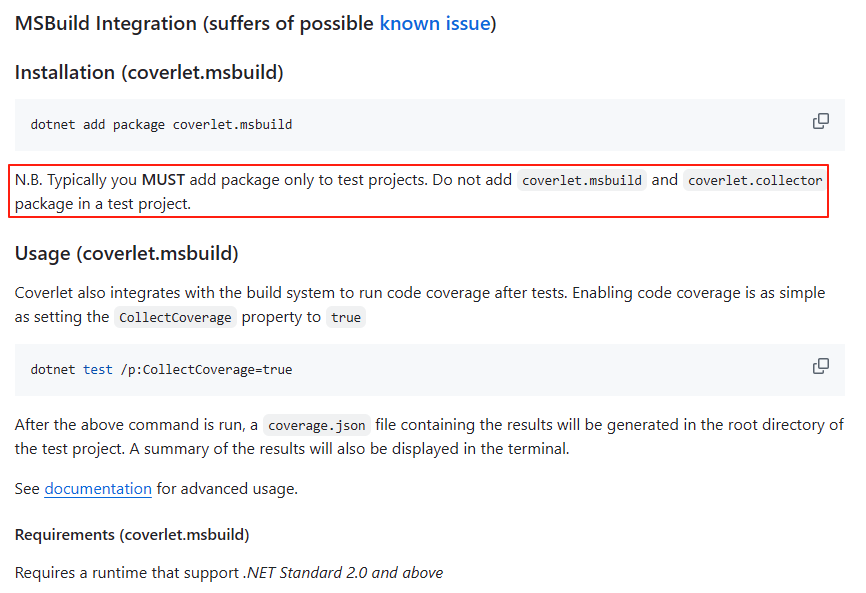
 在如下示例中,我将使用coverlet.msbuild包(https://github.com/coverlet-coverage/coverlet/blob/master/Documentation/MSBuildIntegration.md),因此只装coverlet.msbuild包,新建单元测试项目时,将默认使用的包coverlet.collector删除。
ReportGenerator
https://github.com/danielpalme/ReportGenerator
生成漂亮的报告,需要全局安装,这个包可以将coverlet生成的文件转换成精美的图表文档。
dotnet tool install -g dotnet-reportgenerator-globaltool
使用时只需指定文件执行即可
reportgenerator -reports:coverage.opencover.xml -targetdir:report
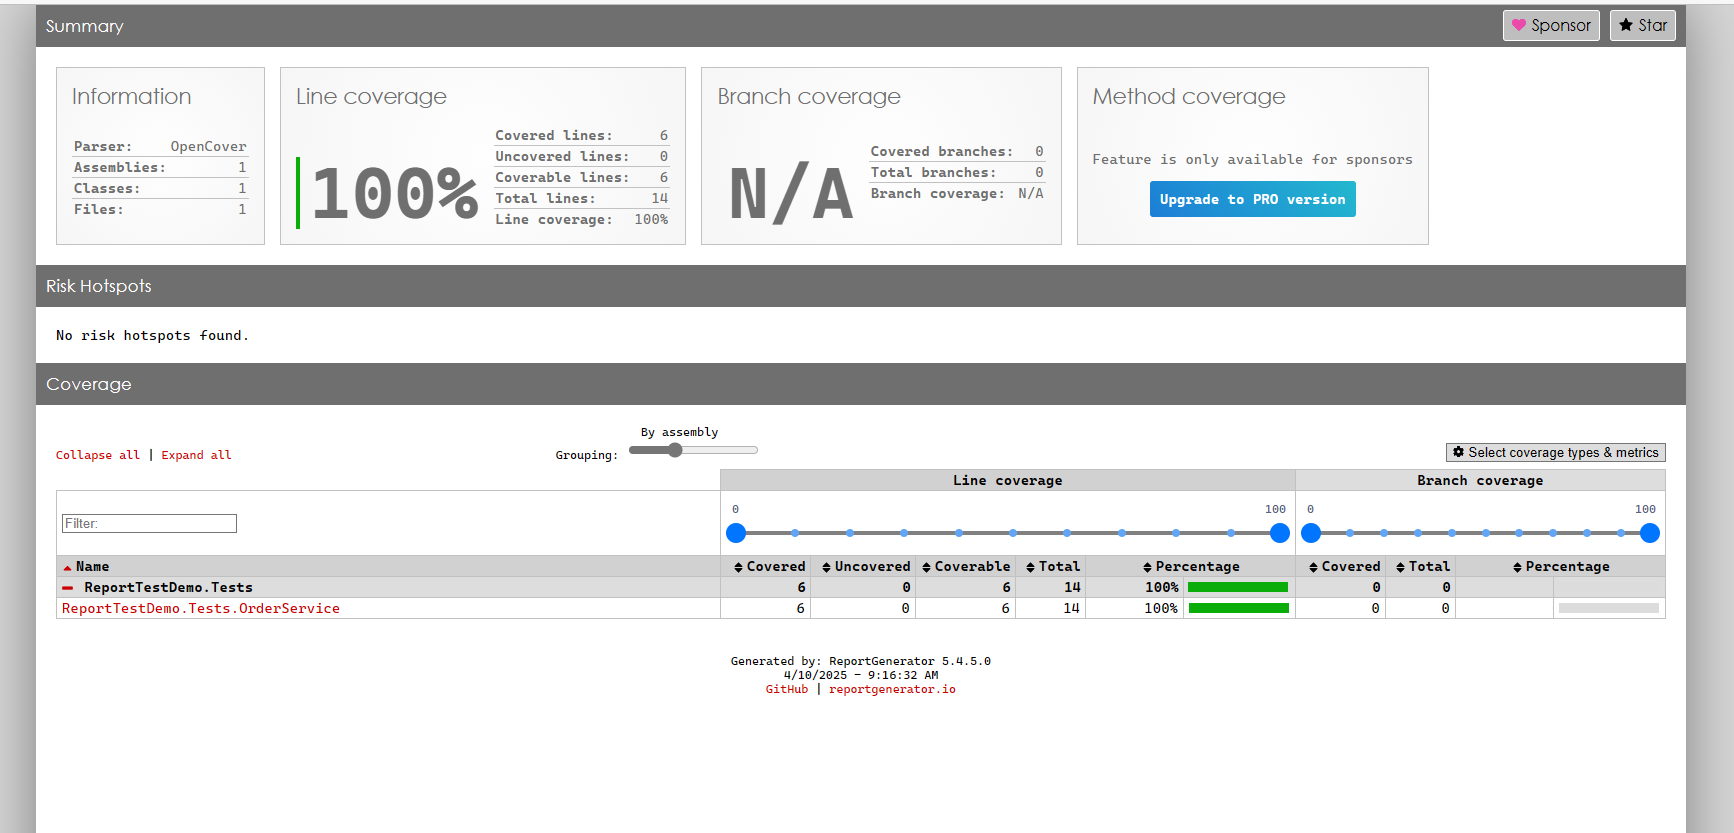
在当前目录下会创建report文件夹,其中index.html为更加明了易懂的报表文档。
示例
新建项目
新建xUnit的测试项目ReportTestDemo.Tests,此处使用DotNet6.0,该项目中同时存在被测类和测试代码,如下移除默认包,增加coverlet.msbuild包。
mkdir ReportTestDemo
cd ReportTestDemo
dotnet new xunit -n ReportTestDemo.Tests --framework net6.0
dotnet add .\ReportTestDemo.Tests\ package coverlet.msbuild --version 6.0.4
dotnet remove .\ReportTestDemo.Tests\ package coverlet.collector
新建被测类和测试代码类
// OrderService.cs
namespace ReportTestDemo.Tests;


public class OrderService
{
    public int GetCurrentValue()
    {
        return 1;
    }


    public int GetExpectedValue()
    {
        return 1;
    }
}


// OrderServiceUnitTest.cs
namespace ReportTestDemo.Tests;


[ExcludeFromCodeCoverage]
public class OrderServiceUnitTest
{
    [Fact]
    public void Test1()
    {
        var orderService = new OrderService();
        Assert.Equal(orderService.GetCurrentValue(), orderService.GetExpectedValue());
    }
}
执行测试
执行命令运行测试,当前目录下生成了coverage.opencover.xml文件。
dotnet test /p:CollectCoverage=true /p:CoverletOutputFormat=opencover /p:IncludeTestAssembly=true /p:ExcludeByAttribute="TestSDKAutoGeneratedCode"
/p:CollectCoverage=true :启用Coverlet收集覆盖率数据
/p:CoverletOutputFormat=opencover:输出格式设置为opencover
/p:IncludeTestAssembly=true :包含自身程序集到测试上下文
/p:ExcludeByAttribute=“TestSDKAutoGeneratedCode”:从测试中排除特定特性标记的类
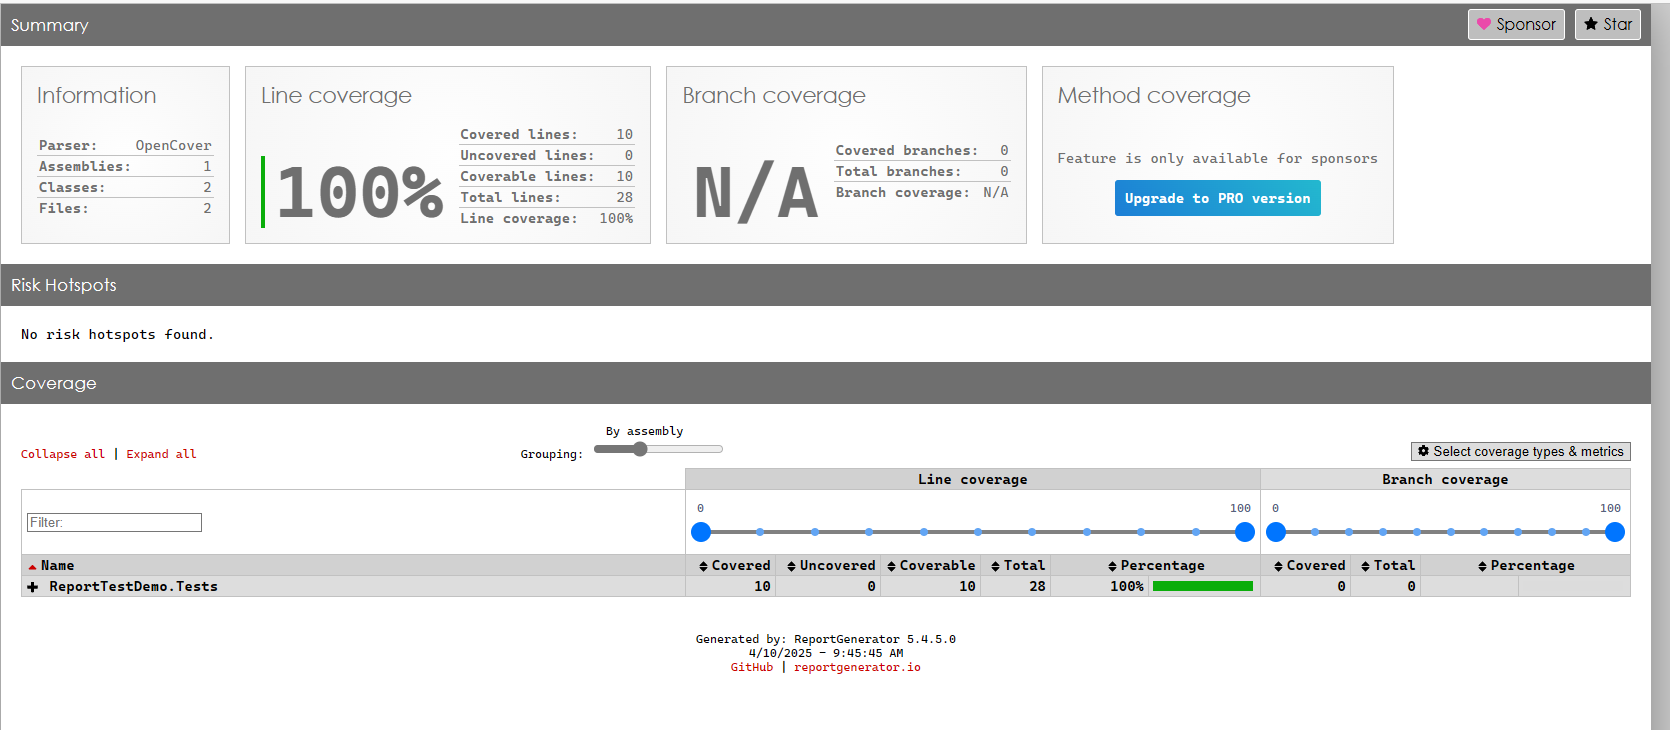
生成图表
将xml文件转化成漂亮的图表
reportgenerator -reports:coverage.opencover.xml -targetdir:report
扩展
包含测试程序集自身
一般场景下是类库和测试程序分开,特定场景下,新建了UnitTest测试项目,其中同时包含被测类和测试代码,如果直接想要使用coverlet输出覆盖率
dotnet test /p:CollectCoverage=true /p:CoverletOutputFormat=opencover /p:IncludeTestAssembly=true /p:ExcludeByAttribute="TestSDKAutoGeneratedCode"
关键参数之一:/p:IncludeTestAssembly=true,这行能够令测试项目包含自身的所有类,再在测试代码上标记[ExcludeFromCodeCoverage],测试统计中排除测试代码。
关键参数之二:/p:ExcludeByAttribute=“TestSDKAutoGeneratedCode”,这行能够令最终的测试报告中排除默认生成的AutoGeneratedProgram类,最终得到纯净的测试报告仅关于被测类本身的。https://github.com/coverlet-coverage/coverlet/issues/604
排除特定标记类
[ExcludeFromCodeCoverage]特性可能加上的地方多,导致繁琐,也可以在测试命令中进行过滤,从而在测试代码上不加这个特性。
dotnet test /p:CollectCoverage=true /p:CoverletOutputFormat=opencover /p:IncludeTestAssembly=true /p:ExcludeByAttribute="TestSDKAutoGeneratedCode" /p:ExcludeByFile="**/*Test.cs"
关键参数:/p:ExcludeByFile="**/*Test.cs",过滤特定文件后缀名。
排除特定程序集或命名空间
另外一种覆盖更广的方式/p:Exclude,这种是基于程序集名和命名空间过滤,想要精确过滤特定类型的文件不如ExcludeByFile,过滤一类程序集或命名空间更适合。
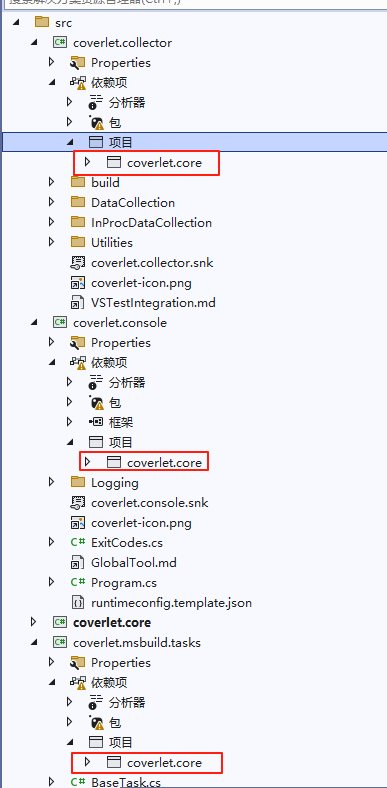
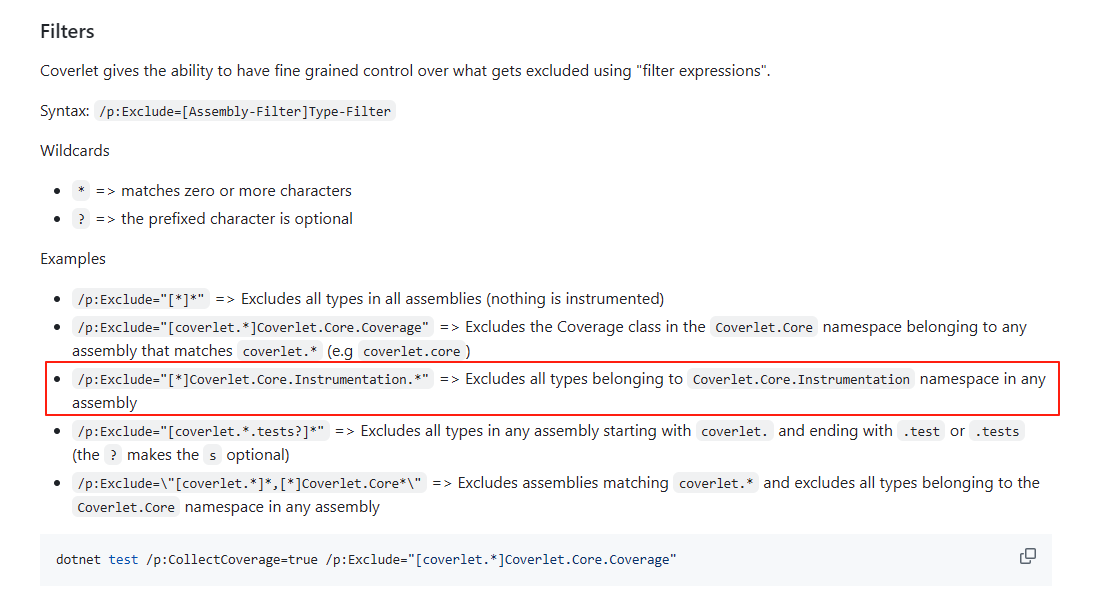 如上红框中这个场景更为方便理解Exclude的过滤方式。
特定测试生成报告
只为特定测试代码生成测试报告 https://learn.microsoft.com/zh-cn/dotnet/core/testing/selective-unit-tests?pivots=mstest
如上xUnit下,指定命名空间和测试代码类名
dotnet test --filter FullyQualifiedName~ReportTestDemo.Tests.OrderServiceUnitTest
参考文档
- https://learn.microsoft.com/zh-cn/dotnet/core/testing/unit-testing-code-coverage
- https://www.code4it.dev/blog/code-coverage-vs-2019-coverlet/
- https://www.cnblogs.com/yangxu-pro/p/9326127.html
- https://www.cnblogs.com/stulzq/p/17188001.html
2025-01-12,望技术有成后能回来看见自己的脚步。