Blazor WebAssembly&JWT鉴权授权
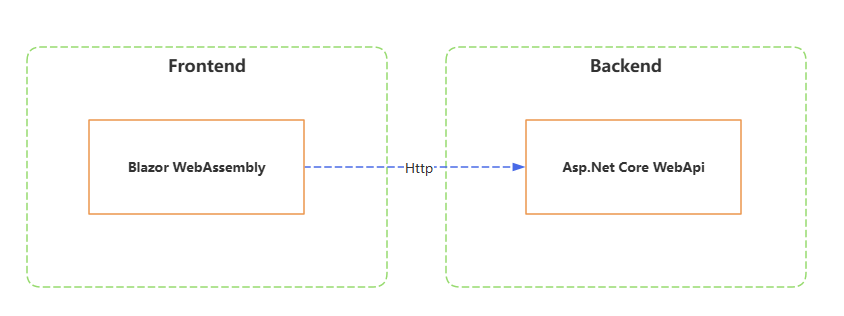
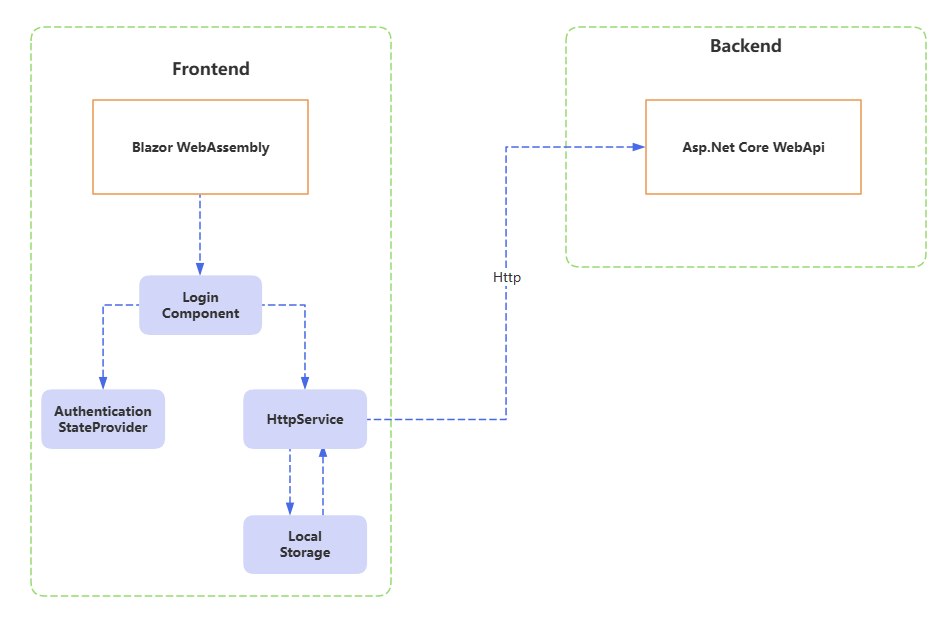
前后端分离下,后端专注于业务逻辑,前端专注于页面交互,Blazor WebAssembly令后端开发者降低学习成本,也能够玩转一些前端开发功能。本文仅简单介绍前后端交互,借助于Blazor WebAssembly如何调用接口,鉴权授权。
新建项目
前端项目为Blazor WebAssembly(Standalone)模板,后端为WebApi。
 本文使用DotNet CLI快速搭建。
dotnet new blazorwasm -n AppDemo -f net9.0
dotnet new webapi -n ApiDemo -f net9.0 -controllers
dotnet new sln
dotnet sln add .\AppDemo\
dotnet sln add .\ApiDemo\
服务端令牌接口
安装Nuget包
dotnet add package Microsoft.AspNetCore.Authentication.JwtBearer
本次不使用数据库验证,直接模拟返回一个JWT。
[ApiController]
[Route("api/[controller]")]
public class AccountController : ControllerBase
{
    private const string SecretKey = "YourSuperSecretKeyThatIsAtLeast32CharactersLong!";
    private const string Issuer = "ApiDemo";
    private const string Audience = "ApiDemo";
    private const int ExpirationMinutes = 60;

    [Authorize]
    [HttpGet("CurrentUserName")]
    public string GetCurrentUserName()
    {
        return "admin";
    }

    [HttpPost("Login")]
    public IActionResult Login([FromBody] LoginRequest request)
    {
        // 示例:简单的硬编码验证(实际项目中应该从数据库验证)
        if (request.Username == "admin" && request.Password == "admin123")
        {
            var token = GenerateJwtToken(request.Username);
            var expires = DateTime.UtcNow.AddMinutes(ExpirationMinutes);

            return Ok(new LoginResponse
            {
                Token = token,
                Expires = expires
            });
        }

        return Unauthorized(new { message = "用户名或密码错误" });
    }

    private string GenerateJwtToken(string username)
    {
        var key = new SymmetricSecurityKey(Encoding.UTF8.GetBytes(SecretKey));
        var credentials = new SigningCredentials(key, SecurityAlgorithms.HmacSha256);

        var claims = new[]
        {
            new Claim(ClaimTypes.Name, username),
            new Claim(ClaimTypes.NameIdentifier, username),
            new Claim(JwtRegisteredClaimNames.Sub, username),
            new Claim(JwtRegisteredClaimNames.Jti, Guid.NewGuid().ToString())
        };

        var token = new JwtSecurityToken(
            issuer: Issuer,
            audience: Audience,
            claims: claims,
            expires: DateTime.UtcNow.AddMinutes(ExpirationMinutes),
            signingCredentials: credentials
        );

        return new JwtSecurityTokenHandler().WriteToken(token);
    }
}

public class LoginRequest
{
    [Required(ErrorMessage = "用户名不能为空")]
    public required string Username { get; set; }

    [Required(ErrorMessage = "密码不能为空")]
    public required string Password { get; set; }
}

public class LoginResponse
{
    public string Token { get; set; } = string.Empty;
    public DateTime Expires { get; set; }
}
服务端鉴权配置
简单使用明文方式配置鉴权服务。设定默认Schema为Jwt格式。
using System.Text;
using Microsoft.AspNetCore.Authentication.JwtBearer;
using Microsoft.IdentityModel.Tokens;

const string secretKey = "YourSuperSecretKeyThatIsAtLeast32CharactersLong!";
const string issuer = "ApiDemo";
const string audience = "ApiDemo";

var builder = WebApplication.CreateBuilder(args);
builder.Services.AddControllers();
builder.Services.AddOpenApi();
builder.Services.AddCors(options =>
{
    options.AddDefaultPolicy(policy =>
    {
        policy.AllowAnyOrigin().AllowAnyHeader().AllowAnyMethod();
    });
});
builder.Services.AddAuthentication(options =>
{
    options.DefaultAuthenticateScheme = JwtBearerDefaults.AuthenticationScheme;
    options.DefaultChallengeScheme = JwtBearerDefaults.AuthenticationScheme;
})
.AddJwtBearer(options =>
{
    options.TokenValidationParameters = new TokenValidationParameters
    {
        ValidateIssuer = true,
        ValidateAudience = true,
        ValidateLifetime = true,
        ValidateIssuerSigningKey = true,
        ValidIssuer = issuer,
        ValidAudience = audience,
        IssuerSigningKey = new SymmetricSecurityKey(Encoding.UTF8.GetBytes(secretKey))
    };
});

builder.Services.AddAuthorization();

var app = builder.Build();
if (app.Environment.IsDevelopment())
{
    app.MapOpenApi();
}
app.UseCors();
app.UseHttpsRedirection();
app.UseAuthentication();
app.UseAuthorization();
app.MapControllers();
app.Run();
服务端设置完毕,仅当用户名密码正确下返回JWT。
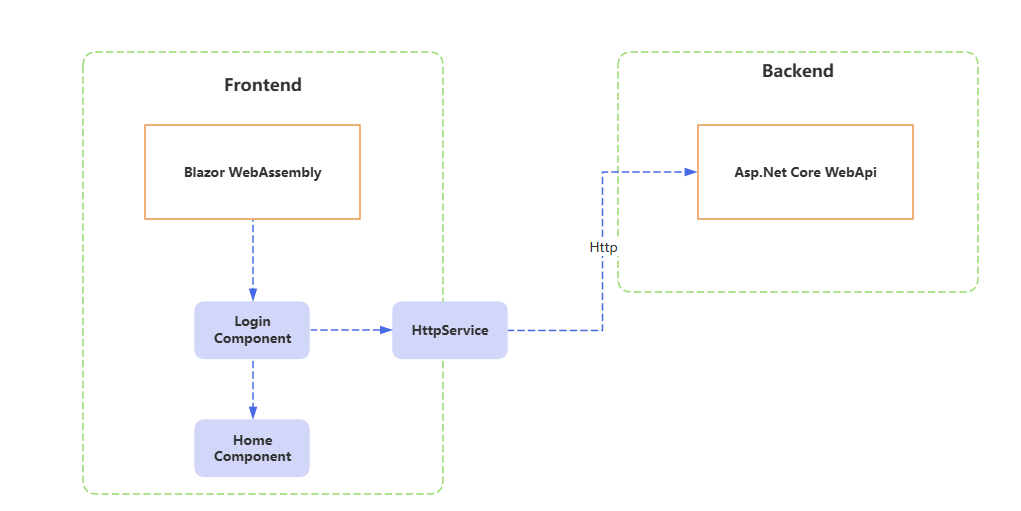
客户端请求令牌
Blazor WebAssembly项目中,分开Http的实现通常是个好的做法,新建一个HttpService,并实现请求后端令牌地址。
public class HttpService
{
    private readonly HttpClient _httpClient;

    public HttpService(HttpClient httpClient)
    {
        _httpClient = httpClient;
    }

    public async Task<LoginResponse?> LoginAsync(LoginRequest loginRequest)
    {
        var response = await _httpClient.PostAsJsonAsync("api/account/login", loginRequest);
        if (response.IsSuccessStatusCode)
        {
            var loginResponse = await response.Content.ReadFromJsonAsync<LoginResponse>();
            return loginResponse!;
        }

        return null;
    }
}

public class LoginRequest
{
    public required string Username { get; set; }
    public required string Password { get; set; }
}

public class LoginResponse
{
    public string Token { get; set; } = string.Empty;
    public DateTime Expires { get; set; }
}
将其注册到服务容器中
builder.Services.AddScoped<HttpService>();
实现一个简单登录页,调用后端拿到Token。
@page "/login"
@layout EmptyLayout
@using AppDemo.Infrastructures
@inject HttpService _httpService
@inject NavigationManager _navigationManager

<PageTitle>Login</PageTitle>

<div style="display: flex; flex-direction: column; align-items: center; justify-content: center; min-height: 300px;">
    <h1>AppDemo</h1>
    <input type="text" @bind="username" class="form-control mb-2" style="max-width: 300px;" placeholder="Username" />
    <input type="password" @bind="password" class="form-control mb-2" style="max-width: 300px;" placeholder="Password" />
    <button @onclick="LoginAsync" class="btn btn-primary" style="width: 300px;">Login</button>
</div>

@code{
    private string username = string.Empty;
    private string password = string.Empty;

    private async Task LoginAsync()
    {
        var loginRequest = new LoginRequest { Username = username, Password = password };
        var loginResponse = await _httpService.LoginAsync(loginRequest);
        if (loginResponse != null)
        {
            _navigationManager.NavigateTo("/");
        }
        else
        {
            Console.WriteLine("Login failed");
        }
    }
}
如此,登录完成后跳转到首页,可是首页要获取用户信息没有token怎么请求,token该存储在哪里。即身份状态需要共享到其他组件中,以支持其他组件需求。
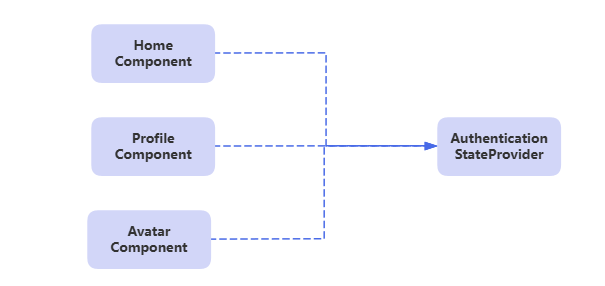
客户端身份状态共享
在纯前端项目中,跨组件共享状态是普遍的。特别是身份验证状态,需要所有组件都可共享。在Blazor WebAssembly中,抽象好了一个AuthenticationStateProvider类来共享身份信息。包括获取身份信息。身份信息变更回调。为此实现一个自定义的StateProvider,在这其中管理JWT。
 需要增加一个Nuget包
dotnet add package Microsoft.AspNetCore.Components.Authorization --version 9.0.10
自定义身份状态管理类,其身份状态先随便弄一个。
public class CustomAuthStateProvider : AuthenticationStateProvider
{
    public override async Task<AuthenticationState> GetAuthenticationStateAsync()
    {
        var claims = new List<Claim>
        {
            new Claim(ClaimTypes.Name, "defaultUser")
        };
        var identity = new ClaimsIdentity(claims, "CustomAuth");
        var user = new ClaimsPrincipal(identity);
        return new AuthenticationState(user);
    }
}
注册鉴权服务、级联身份验证状态服务和自定义身份状态管理类
builder.Services.AddAuthorizationCore();
builder.Services.AddCascadingAuthenticationState();
builder.Services.AddScoped<AuthenticationStateProvider, CustomAuthStateProvider>();
在首页中,获取当前用户信息。
<AuthorizeView>
    <Authorized>
        <p>Hello, @context.User.Identity?.Name! Welcome to your new app.</p>
    </Authorized>
    <NotAuthorized>
        <p>You're not authorized.</p>
    </NotAuthorized>
</AuthorizeView>
此时,仅仅是展示GetAuthenticationStateAsync中的默认值。为此改造一番,在登录完成后,获取到用户信息替换默认值。
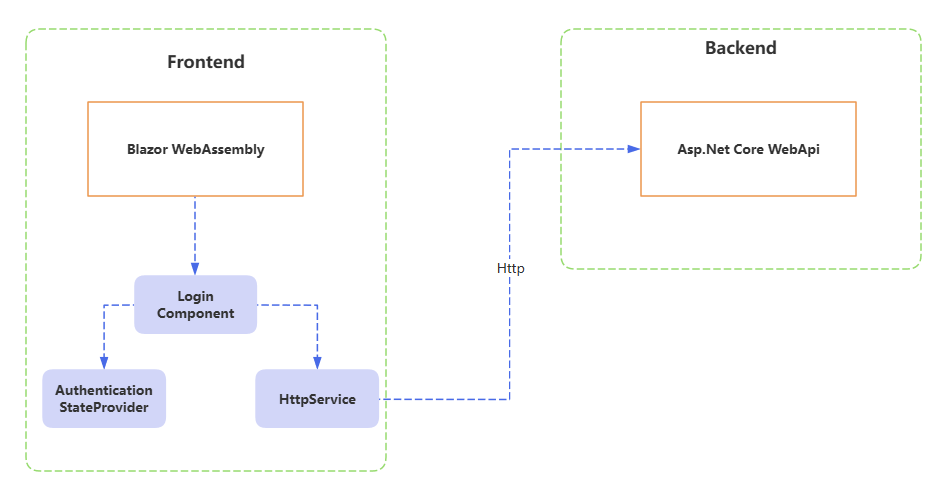
客户端请求身份信息
为了令获取到的信息是当前登录人的信息,请求服务端Api,而请求过程需要已得到的Token,因此在登录完成后,需要将Token保存到HttpClient中,以便于在GetAuthenticationStateAsync中请求服务端Api时,能够正常请求。
 在登录完成后,保存Token到HttpClient头中,以能够在下一次请求时正常。
public async Task<LoginResponse?> LoginAsync(LoginRequest loginRequest)
{
    var response = await _httpClient.PostAsJsonAsync("api/account/login", loginRequest);
    if (response.IsSuccessStatusCode)
    {
        var loginResponse = await response.Content.ReadFromJsonAsync<LoginResponse>();
        // 保存到请求头中
        _httpClient.DefaultRequestHeaders.Authorization = new AuthenticationHeaderValue("Bearer", loginResponse.Token);
        return loginResponse!;
    }

    return null;
}
并同步StateProvider获取用户信息,以及令身份状态更新
var loginRequest = new LoginRequest { Username = username, Password = password };
var loginResponse = await _httpService.LoginAsync(loginRequest);
if (loginResponse != null)
{
    await ((CustomAuthStateProvider)_authStateProvider).MarkUserAsAuthenticated();
    _navigationManager.NavigateTo("/");
}
在StateProvider中,先获取最新用户信息,在刷新身份状态,当GetAuthenticationStateAsync中请求服务端Api时,默认携带了请求头,因此不会出现401错误。
public class CustomAuthStateProvider : AuthenticationStateProvider
{
    private readonly HttpService _httpService;

    public CustomAuthStateProvider(HttpService httpService)
    {
        _httpService = httpService;
    }

    public override async Task<AuthenticationState> GetAuthenticationStateAsync()
    {
        var user = new ClaimsPrincipal(new ClaimsIdentity());

        try
        {
            var currentUserName = await _httpService.GetCurrentUserName();
            var claims = new List<Claim>
            {
                new Claim(ClaimTypes.Name, currentUserName)
            };
            var identity = new ClaimsIdentity(claims, "CustomAuth");
            user = new ClaimsPrincipal(identity);
        }
        catch (Exception ex)
        {
            Console.WriteLine(ex.Message);
        }

        return new AuthenticationState(user);
    }

    public async Task MarkUserAsAuthenticated()
    {
        // 刷新身份状态
        NotifyAuthenticationStateChanged(GetAuthenticationStateAsync());
    }
}
客户端令牌写入LocalStorage
这种方案下,令牌只是在内存中持有,当刷新页面、关闭Tab页或者关闭浏览器,下次再打开,又得重新登录获取,为此,需要将其存储到LocalStorage中。
 新增Nuget包
dotnet add package Blazored.LocalStorage --version 4.5.0
服务注册
builder.Services.AddBlazoredLocalStorage();
只需修改HttpService,当每次实例化时,从LocalStorage中拿到Token,当登录完成后,存储Token即可。
public class HttpService
{
    private readonly HttpClient _httpClient;
    private readonly ISyncLocalStorageService _localStorageService;

    public HttpService(HttpClient httpClient, ISyncLocalStorageService localStorageService)
    {
        _httpClient = httpClient;
        _localStorageService = localStorageService;

        var token = _localStorageService.GetItem<string>("token");
        if (token != null)
        {
            _httpClient.DefaultRequestHeaders.Authorization = new AuthenticationHeaderValue("Bearer", token);
        }
    }

    public async Task<LoginResponse?> LoginAsync(LoginRequest loginRequest)
    {
        var response = await _httpClient.PostAsJsonAsync("api/account/login", loginRequest);
        if (response.IsSuccessStatusCode)
        {
            var loginResponse = await response.Content.ReadFromJsonAsync<LoginResponse>();
            _httpClient.DefaultRequestHeaders.Authorization = new AuthenticationHeaderValue("Bearer", loginResponse.Token);

            _localStorageService.SetItem("token", loginResponse.Token);

            return loginResponse!;
        }

        return null;
    }

    public async Task<string?> GetCurrentUserName()
    {
        var response = await _httpClient.GetAsync("api/account/CurrentUserName");
        if (response.IsSuccessStatusCode)
        {
            var currentUserName = await response.Content.ReadAsStringAsync();
            return currentUserName!;
        }

        return null;
    }
}
客户端退出
退出无非是清理LocalStorage中的Token,附带要更新StateProvider当前状态。
在HttpService内,清理LocalStorage中的Token,与重置生命周期内HttpClient的头。
public async Task LogoutAsync()
{
    _httpClient.DefaultRequestHeaders.Authorization = null;
    _localStorageService.RemoveItem("token");
}
在StateProvider内,更新身份状态。
public async Task MarkUserAsUnauthenticated()
{
    // 刷新身份状态
    NotifyAuthenticationStateChanged(GetAuthenticationStateAsync());
}
最终点击Logout按钮触发事件内执行逻辑
private async Task Logout()
{
    await _httpService.LogoutAsync();
    await ((CustomAuthStateProvider)_authStateProvider).MarkUserAsUnauthenticated();
    _navigationManager.NavigateTo("/Login");
}
客户端路由权限控制
当浏览器中直接敲入目标地址,如果当前未处于登录状态且目标地址为鉴权完成才能查看,则需要对目标地址进行保护。
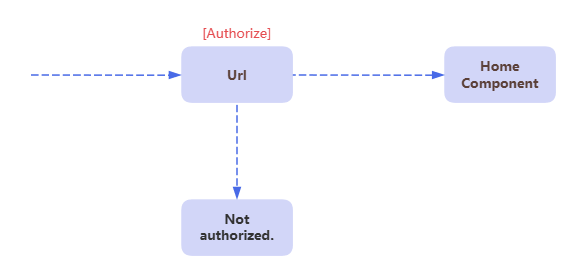 默认的路由设定为未鉴权也可以访问,需要替换为鉴权完毕才能访问,在App.razor中替换,RouteView为AuthorizeRouteView
@using Microsoft.AspNetCore.Components.Authorization

<Router AppAssembly="@typeof(App).Assembly">
    <Found Context="routeData">
        <AuthorizeRouteView RouteData="@routeData" DefaultLayout="@typeof(MainLayout)" />
        <FocusOnNavigate RouteData="@routeData" Selector="h1" />
    </Found>
    <NotFound>
        <PageTitle>Not found</PageTitle>
        <LayoutView Layout="@typeof(MainLayout)">
            <p role="alert">Sorry, there's nothing at this address.</p>
        </LayoutView>
    </NotFound>
</Router>
当没有鉴权通过时,可以进行重定向跳转到登录页。新建一个重定向组件。示例如下。
@inject NavigationManager Navigation

@code {
    protected override void OnInitialized()
    {
        Navigation.NavigateTo("/login");
    }
}
应用到App.razor中便是根据身份状态判断,重定向到登录页或者提示没有访问权限。
<AuthorizeRouteView RouteData="@routeData" DefaultLayout="@typeof(MainLayout)">
    <NotAuthorized>
        @if (context.User.Identity?.IsAuthenticated != true)
        {
            <RedirectToLogin />
        }
        else
        {
            <p role="alert">You are not authorized to access this resource.</p>
        }
    </NotAuthorized>
</AuthorizeRouteView>
客户端获取身份状态
在之前的示例中是借助于AuthorizeView,其内部封装好了user。
<AuthorizeView>
    <Authorized>
        <p>Hello, @context.User.Identity?.Name!</p>
    </Authorized>
    <NotAuthorized>
        <p>You're not authorized.</p>
    </NotAuthorized>
</AuthorizeView>
但是如果想要手动获取状态从而判断是否鉴权与否。可以通过Task参数。这个依赖于服务注册时的builder.Service.AddCascadingAuthenticationState,其内部实现是实例化Task。
@code {
    private string? _userName = "";

    [CascadingParameter]
    private Task<AuthenticationState>? authenticationState { get; set; }

    private async Task DoSomething()
    {
        if (authenticationState is not null)
        {
            var authState = await authenticationState;
            var user = authState?.User;

            if (user is not null)
            {
                if (user.Identity is not null && user.Identity.IsAuthenticated)
                {
                    _userName = user.Identity.Name;
                }
            }
        }
    }
}
可能会说是否可以直接注入AuthenticationStateProvider,可以但不建议,因为身份验证状态发生改变,不会自动通知组件。 https://learn.microsoft.com/zh-cn/aspnet/core/blazor/security/?view=aspnetcore-9.0&tabs=visual-studio#authenticationstateprovider-service
获取身份状态也就区分了使用场景,在Html中使用AuthorizeView,在Code中使用Task,这两个内部都是从AuthenticationStateProvider获取身份状态。
注意事项
Route上写是.Net8以前的用法,之后是采用服务注册builder.Service.AddCascadingAuthenticationState。很多文章视频中都是用的稀里糊涂。
默认场景下,Task是需要依赖于AddCascadingAuthenticationState。但在使用了AuthorizeRouteView后,发现无需注册AddCascadingAuthenticationState,也能够正常使用Task,
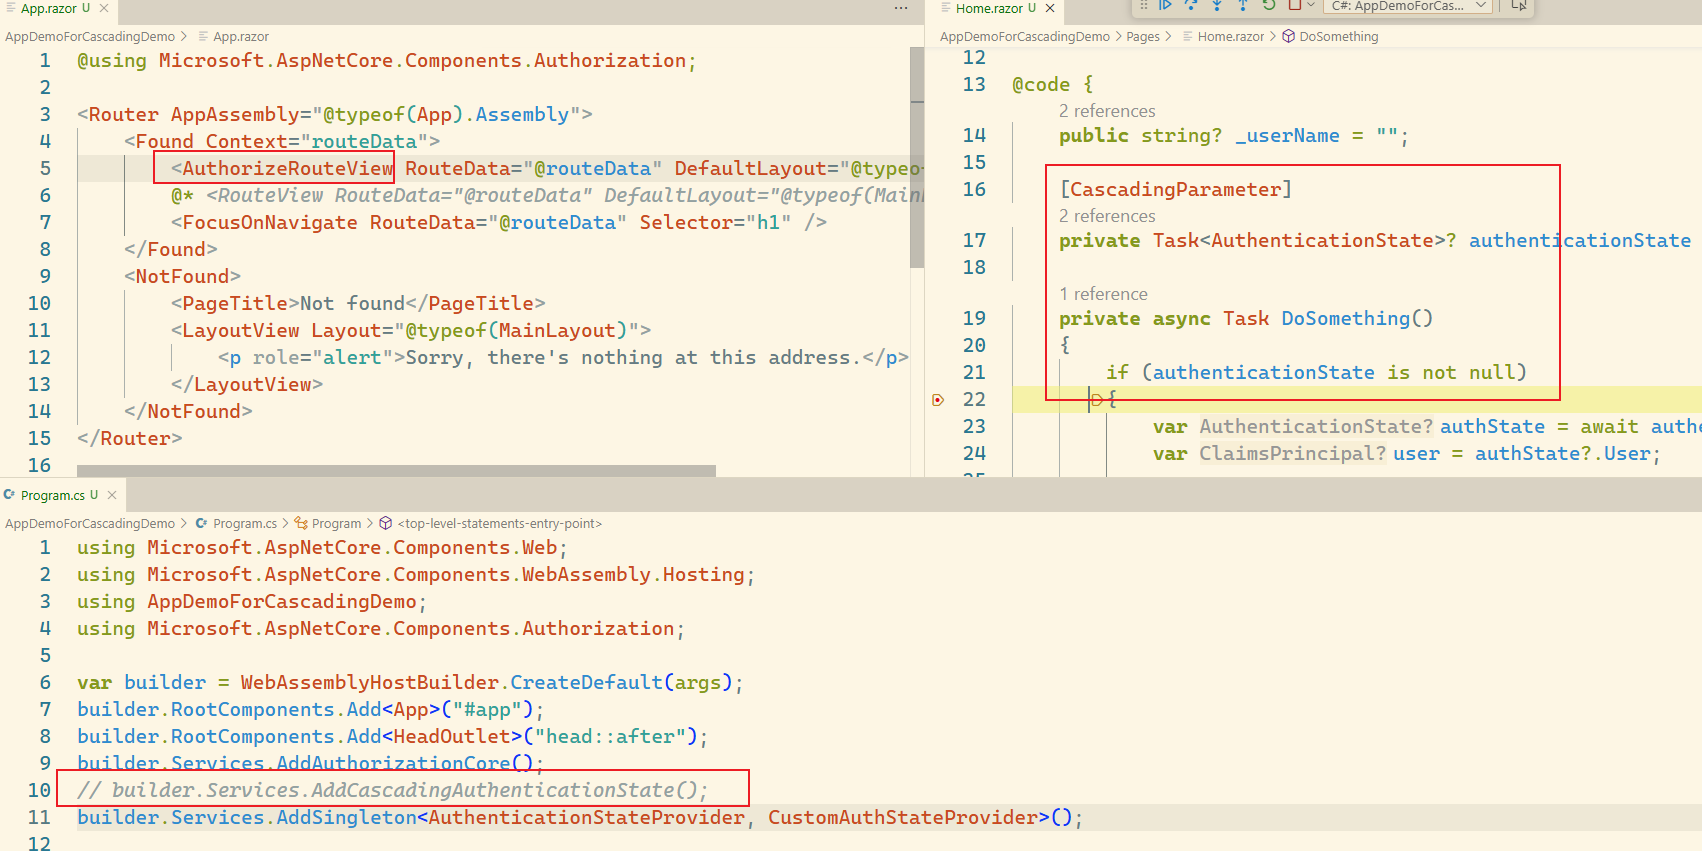 找到源码发现,AuthorizeRouteView中存在了一个判断逻辑,当没有时,会有一些处理逻辑。
https://source.dot.net/#Microsoft.AspNetCore.Components.Authorization/AuthorizeRouteView.cs,70
参考文档
2025-07-08,望技术有成后能回来看见自己的脚步。