Blazor WebApp-Server&Cookie鉴权授权
Blazor WebApp-Server模式,借助于SignalR,能够令前端的一些操作移交到后端处理,本文仅简单介绍登录完成和鉴权授权过程。
新建项目
项目为Blazor WebApp-Server模板,没有启用全局交互模式,由各个页面自行设定交互方式。本文使用DotNet CLI快速搭建。
otnet new blazor -n ServerDemo -f net9.0 -int Server
dotnet new sln
dotnet sln add .\ServerDemo\
设置鉴权授权
和Asp.Net Core的鉴权授权方式相同,本文使用Cookie来作为schema。在服务注册时设定鉴权和授权配置,添加鉴权授权中间件。注册AddCascadingAuthenticationState服务,在组件间共享身份状态。
using Microsoft.AspNetCore.Authentication.Cookies;
using ServerDemo.Components;

var builder = WebApplication.CreateBuilder(args);
builder.Services.AddRazorComponents()
    .AddInteractiveServerComponents();
builder.Services.AddAuthentication(CookieAuthenticationDefaults.AuthenticationScheme)
    .AddCookie(options =>
    {
        options.Cookie.Name = "auth_token";
        options.Cookie.MaxAge = TimeSpan.FromMinutes(30);
        options.LoginPath = "/login";
        options.AccessDeniedPath = "/access-denied";
    });
builder.Services.AddAuthorization();
builder.Services.AddCascadingAuthenticationState();

var app = builder.Build();
if (!app.Environment.IsDevelopment())
{
    app.UseExceptionHandler("/Error", createScopeForErrors: true);
    app.UseHsts();
}
app.UseHttpsRedirection();
app.UseAntiforgery();
app.MapStaticAssets();
app.UseAuthentication();
app.UseAuthorization();
app.MapRazorComponents<App>()
    .AddInteractiveServerRenderMode();
app.Run();
创建登录页面
简单实现用户名密码验证登录页面,同时在本页面上进行Cookie生成。此处,点击表单提交,使用的是Http请求,服务端对应AuthenticateUserAsync方法处理,等同于WebApi机制,只是使用的是另一种Http Api机制。
@page "/login"
@layout EmptyLayout
@using Microsoft.AspNetCore.Authentication
@using Microsoft.AspNetCore.Authentication.Cookies
@using ServerDemo.Components.Layout
@using ServerDemo.Models
@using System.Security.Claims

@inject NavigationManager Navigation

<div style="display: flex; flex-direction: column; align-items: center; justify-content: center; min-height: 300px;">
    <EditForm Model="@LoginViewModel" OnValidSubmit="AuthenticateUserAsync" FormName="LoginForm">
        <DataAnnotationsValidator />
        <div class="mb-3 text-center flex-column">
            <h1 class="h3 mb-3 font-weight-normal">请登录</h1>
        </div>
        <div class="mb-3">
            <label for="UserName">用户名</label>
            <InputText id="UserName" @bind-Value="LoginViewModel.UserName" class="form-control" />
            <ValidationMessage For="@(() => LoginViewModel.UserName)" />
        </div>
        <div class="mb-3">
            <label for="Password">密码</label>
            <InputText id="Password" @bind-Value="LoginViewModel.Password" class="form-control" />
            <ValidationMessage For="@(() => LoginViewModel.Password)" />
        </div>
        <div class="mb-3">
            <span class="text-danger">@errorMessage</span>
        </div>
        <div class="mb-3">
            <button type="submit" class="btn btn-primary">登录</button>
        </div>
    </EditForm>
</div>

@code {
    [CascadingParameter]
    public HttpContext? HttpContext { get; set; }

    [SupplyParameterFromForm]
    public LoginViewModel LoginViewModel { get; set; } = new LoginViewModel();

    private string? errorMessage;

    private async Task AuthenticateUserAsync()
    {
        // 模拟用户名和密码验证
        if (LoginViewModel.UserName == "admin" && LoginViewModel.Password == "admin123")
        {
            var claims = new List<Claim>
            {
                new Claim(ClaimTypes.Name, LoginViewModel.UserName),
                new Claim(ClaimTypes.Role, "Admin"),
            };
            var identity = new ClaimsIdentity(claims, CookieAuthenticationDefaults.AuthenticationScheme);
            var principal = new ClaimsPrincipal(identity);
            await HttpContext!.SignInAsync(principal);
            Navigation.NavigateTo("/");
        }
        else
        {
            errorMessage = "用户名或密码错误";
        }
    }
}
登录完毕后,Cookie写入到浏览器中,后续请求到服务端都会被携带着。
展示用户信息
登录完毕,重定向到首页后,展示用户信息,组件渲染是在后端完成的,因此可以很方便的获取到用户信息。直接借助于AuthorizeView即可来区分已鉴权未鉴权用户。
<AuthorizeView>
    <Authorized>
        <p>Hello, @context.User.Identity?.Name!</p>
        <p>
            <a href="/logout">Logout</a>
        </p>
    </Authorized>
    <NotAuthorized>
        <a href="/login">Login</a>
    </NotAuthorized>
</AuthorizeView>
这种方式使用的是AuthorizeView组件,如果是在代码中想要判断当前用户登录状态,则可以借助于Task。
@page "/test"
@using Microsoft.AspNetCore.Components.Authorization
@rendermode InteractiveServer

<PageTitle>Test</PageTitle>

<h1>Test</h1>

My Name: @_userName
<button class="btn btn-primary" @onclick="DoSomething">DoSomething</button>

@code {
    private string? _userName = "";

    [CascadingParameter]
    private Task<AuthenticationState>? authenticationState { get; set; }

    private async Task DoSomething()
    {
        if (authenticationState is not null)
        {
            var authState = await authenticationState;
            var user = authState?.User;

            if (user is not null)
            {
                if (user.Identity is not null && user.Identity.IsAuthenticated)
                {
                    _userName = user.Identity.Name;
                }
            }
        }
    }
}
注意,这种方式需要页面为InteractiveServer,以将行为给到服务端处理。
创建退出页面
点击退出后,实际上为服务器将Cookie抹除其登录状态。此处为了展示其过程,创建一个退出页面。首次进来,先执行SignOut,再重定向到自身页,展示退出成功信息。
@page "/logout"
@layout EmptyLayout
@using Microsoft.AspNetCore.Authentication
@using Microsoft.AspNetCore.Authentication.Cookies
@using ServerDemo.Components.Layout

@inject NavigationManager Navigation

<div>
    <h1>You have been logged out</h1>
</div>

@code {
    [CascadingParameter]
    public HttpContext? HttpContext { get; set; }

    protected override async Task OnInitializedAsync()
    {
        await base.OnInitializedAsync();
        if (HttpContext.User.Identity.IsAuthenticated)
        {
            await HttpContext!.SignOutAsync();
            Navigation.NavigateTo("/logout",true);
        }
    }
}
未鉴权重定向
当从浏览器直接输入地址,如果目标地址没有鉴权,期望的行为是重定向到登录页。
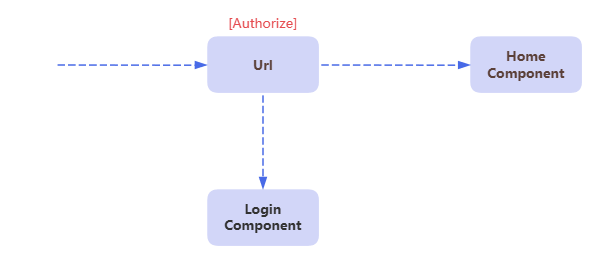 只需要在目标页上加上特性标记即可。如果没有鉴权,因Scheme的设定会有几种不同方案。
@attribute [Authorize]
依照Cookie鉴权规则,当配置了Options,可重定向到LoginPath处。
builder.Services.AddAuthentication(CookieAuthenticationDefaults.AuthenticationScheme)
    .AddCookie(options =>
    {
        options.Cookie.Name = "auth_token";
        options.Cookie.MaxAge = TimeSpan.FromMinutes(30);
        options.LoginPath = "/login";
        options.AccessDeniedPath = "/access-denied";
    });
有鉴权无授权
当鉴权完毕,但是某些操作或者页面不具备权限时,则会重定向到AccessDeniedPath。其值为设定鉴权服务时的地址。
 一般结合Authorize特性或者在服务注册时设定好规则。
注意事项
Route上写是.Net8以前的用法,之后是采用服务注册builder.Service.AddCascadingAuthenticationState。很多文章视频中都是用的稀里糊涂。
在Blazor WebAssembly Standalone模板中,默认场景下,Task是需要依赖于AddCascadingAuthenticationState。但在使用了AuthorizeRouteView后,发现无需注册AddCascadingAuthenticationState,也能够正常使用Task。
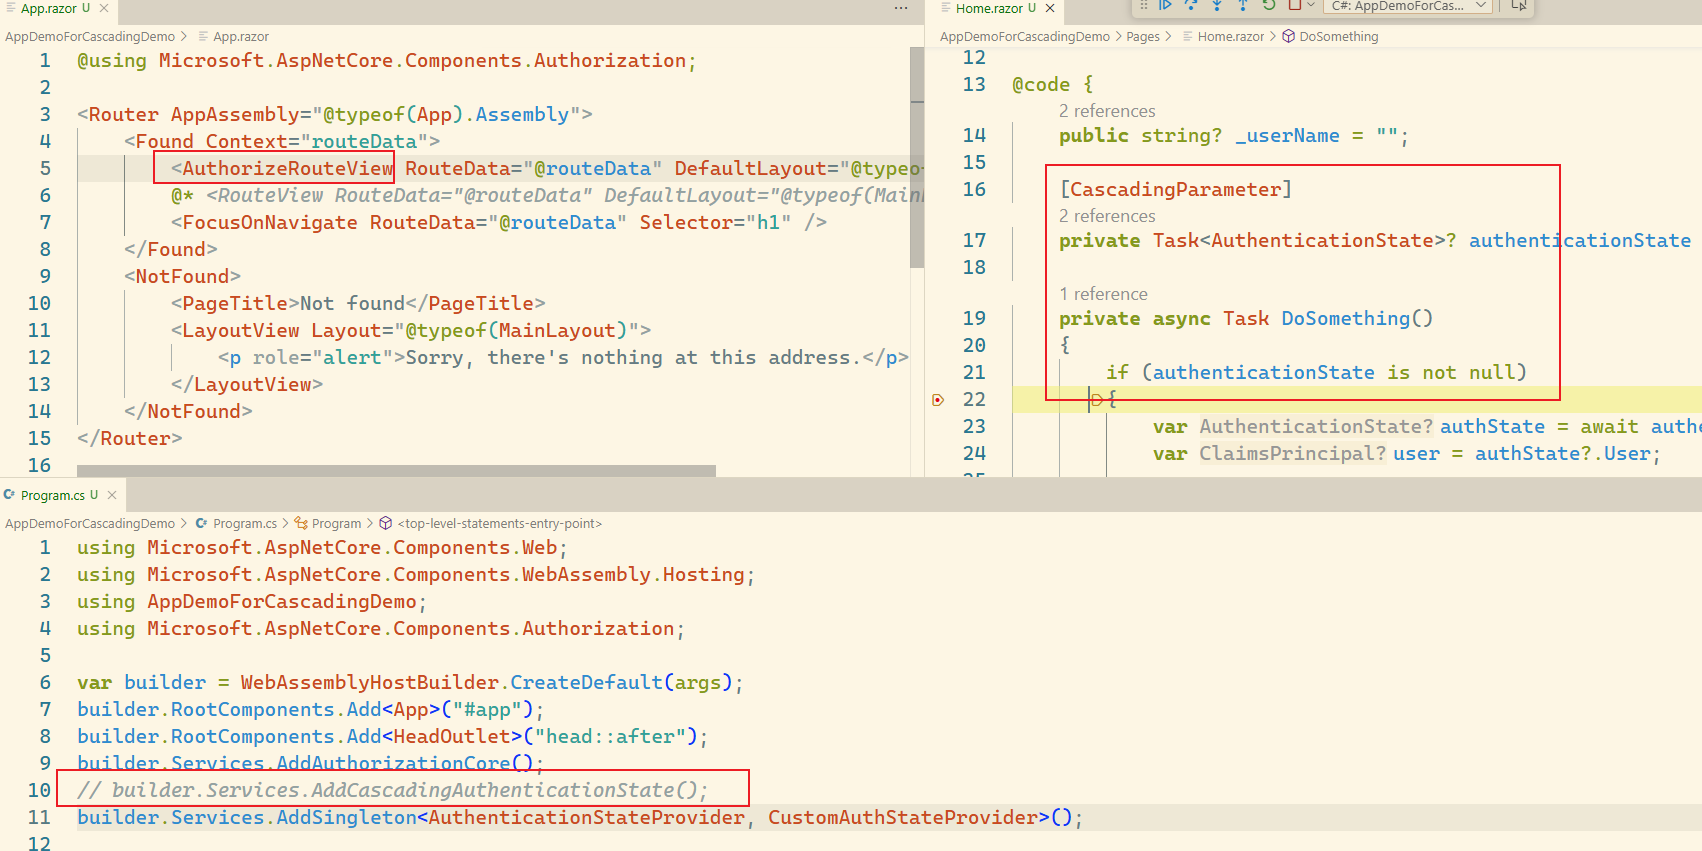 找到源码发现,AuthorizeRouteView中存在了一个判断逻辑,当没有时,会有一些处理逻辑。
https://source.dot.net/#Microsoft.AspNetCore.Components.Authorization/AuthorizeRouteView.cs,70
而在Blazor WebApp-Server模板下,AuthorizeView和Task都需要依赖于AddCascadingAuthenticationState服务注册。在使用了AuthorizeRouteView后,不注册AddCascadingAuthenticationState,AuthorizeView可以正常使用,而Task无法使用。
参考文档
2025-09-26,望技术有成后能回来看见自己的脚步。